If you’re considering a root canal in Burien, WA, it’s critical to understand each step of the process to feel at ease. From recognizing the symptoms to the final stages of recovery, every phase plays a fundamental role in restoring your dental health. Knowing what to expect can help alleviate anxiety and prepare you for a seamless experience. Curious about how it all unfolds and what you might encounter along the way?
Initial Consultation and Diagnosis
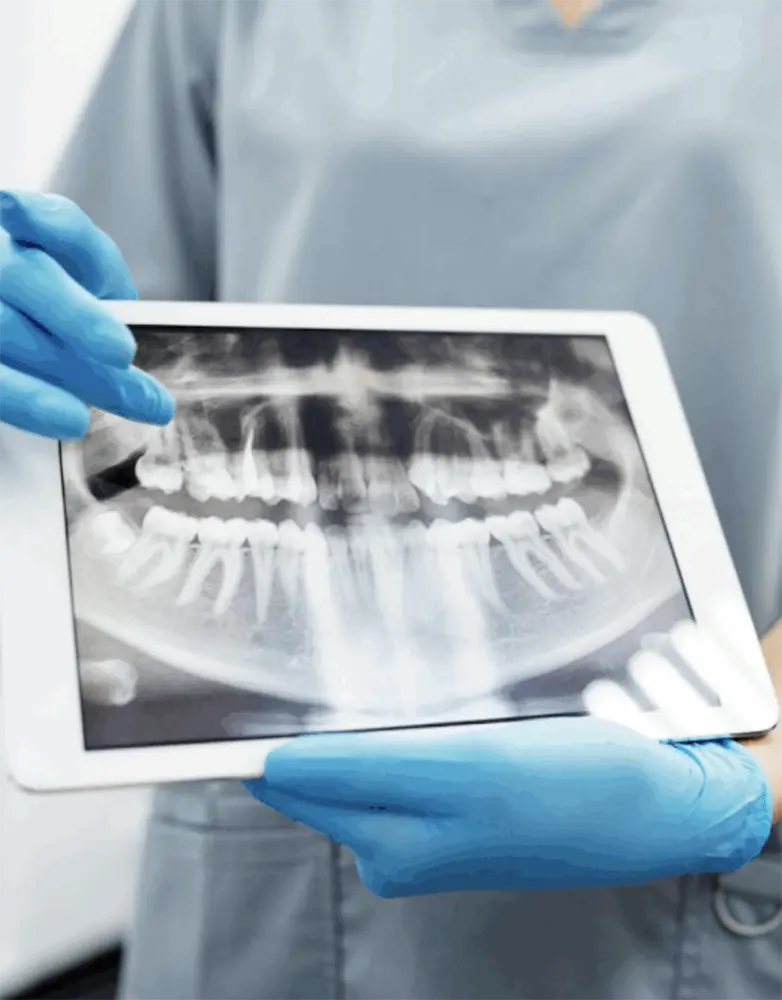
Before starting a root canal procedure in Burien, WA, it is pivotal to have an initial consultation and diagnosis. During this visit, your dentist will evaluate your symptoms and examine your tooth. They might take X-rays to get a clearer picture of the tooth’s condition. It’s a chance for you to discuss any concerns or questions about the procedure. Your dentist will explain what a root canal involves and what you can expect during recovery.
This consultation is indispensable for creating a personalized treatment plan. The dentist needs to determine the extent of the infection and the best approach to save your tooth. It’s also the time to discuss any allergies or medical conditions that could influence the procedure. Remember, clear communication is key to a successful outcome.
Understanding the Need for a Root Canal
After your initial consultation and diagnosis, it’s important to understand why a root canal might be necessary. If you’ve been experiencing severe tooth pain, sensitivity to hot or cold, or swelling, these can be signs that the pulp inside your tooth is infected. This infection can occur due to deep decay, repeated dental procedures on the tooth, or a crack or chip. Ignoring these symptoms might lead to more severe issues, like abscesses or tooth loss. A root canal is designed to remove the infected pulp, clean the inside of the tooth, and seal it, preventing further infection. By addressing the issue early, you’re not only relieving pain but also preserving your natural tooth, which is always the best option.
Preparing for the Procedure
When getting ready for a root canal, it’s essential to know what to expect to ease any anxiety. First, talk with your dentist about the procedure. They’ll explain the steps and help address any concerns you might have. Make sure to discuss your medical history, including any medications or allergies you have, as this information is critical for your safety.
Before your appointment, eat a light meal. You might be in the chair for a while, so being comfortably full can help. Also, arrange for someone to drive you home afterward, since you might feel a bit groggy. Wear comfortable clothing and avoid jewelry near your neck and face. Finally, prepare a playlist or book to keep your mind occupied and relaxed.
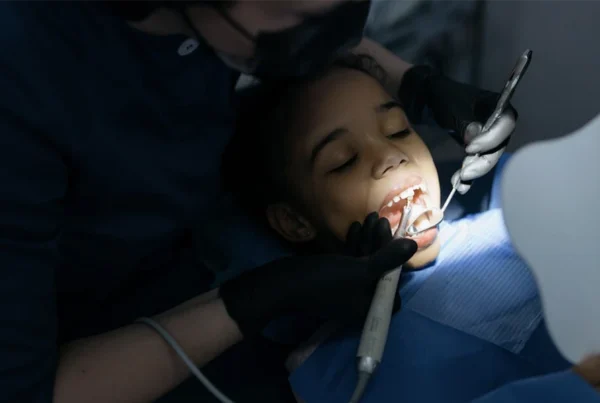
Numbing the Area
When you undergo a root canal in Burien, WA, the dentist will first apply a local anesthetic to numb the area around the affected tooth. This step is pivotal to guarantee you’re comfortable and pain-free throughout the procedure. You’ll feel at ease knowing that your comfort is a top priority.
Local Anesthetic Application
Numbing the area is an essential step in ensuring a comfortable root canal procedure. When you settle into the dental chair, your dentist will apply a topical anesthetic to your gum. This numbs the surface and preps it for the injection. The injection is the main act here, as it delivers local anesthetic directly to the area around the tooth needing treatment. You might feel a slight pinch, but it’s quick. The anesthetic blocks pain signals to your brain, ensuring you won’t feel anything during the procedure. Your comfort is a priority, so if you’re anxious about needles, let your dentist know. They’ll talk you through it and keep you informed every step of the way.
Ensuring Patient Comfort
A key element in guaranteeing patient comfort during a root canal is effective numbing. You’ll want to feel at ease, and the dentist’s first step is applying a local anesthetic to the affected area. This safeguards you won’t feel pain during the procedure. It starts with a topical numbing gel on your gum to ease the needle’s sting. After the gel takes effect, the dentist will gently inject a local anesthetic.
You’ll likely feel a slight pressure, but it shouldn’t be uncomfortable. The objective is to make sure you’re completely numb before proceeding. If you still feel any sensation, let your dentist know immediately. They can administer more anesthetic to protect you remain comfortable throughout the procedure.
Accessing the Infected Pulp
Once the area is fully numbed, your dentist will create a small access opening in the top of your tooth. This allows them to reach and remove the infected pulp tissue effectively. By clearing out the infection, they can start the process of restoring your tooth to health.
Numbing the Affected Area
Before accessing the infected pulp during a root canal procedure, ensuring the affected area is thoroughly numbed is indispensable for patient comfort. You’ll likely receive a local anesthetic, typically administered via an injection near the tooth needing treatment. This step is pivotal as it helps you remain relaxed and pain-free throughout the procedure. The dentist might apply a numbing gel to your gums first, making the injection more comfortable.
You may feel a slight pinch or pressure from the needle, but it’s usually brief. Within minutes, the area around the tooth should be numb, allowing the dentist to proceed without causing discomfort. It’s important to communicate any sensations you feel, as the dentist can administer more anesthetic if necessary.
Drilling Access Opening
With the area now numb, the dentist carefully drills an access opening in the crown of your tooth to reach the infected pulp. This is a vital step, as it allows the dentist to access the root canals where the infection resides. You might feel some pressure, but rest assured, the anesthesia keeps discomfort at bay. The dentist uses a dental drill with precision to avoid unnecessary damage to surrounding structures. The opening is just large enough to allow specialized instruments to navigate through your tooth’s interior. It’s normal to hear the sound of the drill, but it’s a part of ensuring the procedure’s success. By accessing the pulp chamber, the dentist sets the stage for effectively addressing the infection.
Removing Infected Tissue
After the access opening is made, the dentist begins the essential task of removing the infected tissue from your tooth. This step is critical to eliminate bacteria and prevent further infection. Using special tools, the dentist carefully extracts the pulp, which is the soft tissue inside your tooth containing nerves and blood vessels. You might feel some pressure, but it shouldn’t be painful due to the anesthesia.
For patients seeking more details on how this process works, root canal Burien WA offers a deeper look into how dentists clean and restore the tooth to prevent reinfection. The dentist will meticulously clean out the pulp chamber and root canals, guaranteeing that all infected tissue and debris are removed. They may use small files to reshape the canals, making them ready for filling. It’s important that the area is thoroughly cleaned to ascertain successful treatment and future oral health. After this, your dentist will move on to the next phase.
Cleaning and Shaping the Root Canals
As you begin the cleaning and shaping phase of a root canal procedure, it’s crucial to understand that this step is essential for removing bacteria and preparing the tooth for filling. You’ll notice your dentist using small, specialized tools to meticulously clean out the root canals. These tools remove any remaining infected tissue and bacteria, ensuring the canals are free from debris. It’s a precise process that involves enlarging and shaping the canals to create a smooth pathway. This allows for ideal access during the next steps. Your dentist may also use an antimicrobial solution to further disinfect the area. By the end of this phase, the canals should be clean, shaped, and ready for the next critical steps of the procedure.
Filling the Canals
Once the root canals are cleaned and shaped, you’ll learn about the materials chosen for filling them. It’s essential to understand the selection process as different materials guarantee a proper seal, preventing future infections. You’ll also get a clear explanation of the sealing techniques that secure the canal and protect your tooth.
Material Selection Process
Choosing the right material for filling the canals in a root canal procedure is a crucial step that guarantees the long-term success of the treatment. You’ll want to confirm the material effectively seals and adapts to the canal walls, preventing future infections. A widely used material is gutta-percha, known for its biocompatibility and ability to conform to canal irregularities. It’s often paired with a sealer to enhance its sealing properties. Your dentist might also consider materials like resilon, which offers similar benefits but with added flexibility. The choice depends on the specific needs of your tooth, including its anatomy and the extent of infection. Trust your dentist to select the best material, confirming your root canal procedure leads to a successful recovery.
Sealing Techniques Explained
Proper sealing techniques are pivotal for the success of your root canal procedure, as they safeguard the canal is thoroughly filled and protected from future infections. After cleaning and shaping the canal, your dentist will use a biocompatible material like gutta-percha. This rubber-like substance is placed in the canal with a special adhesive cement to guarantee a snug fit. The process often involves a technique called lateral condensation, where your dentist presses the material against the canal walls to eliminate any voids. It’s critical that the filling reaches the end of the canal to prevent bacteria from re-entering. Once the canal is sealed, a temporary or permanent filling is placed on top to further protect and restore your tooth.
Sealing the Tooth
After the root canal procedure is complete, sealing the tooth is a critical step to guarantee its long-term health. This process involves filling the cleaned and shaped root canals with a biocompatible material, usually gutta-percha. It’s essential because it prevents bacteria from re-entering and causing future infections. Your dentist will carefully place the material into the canals, ensuring a snug fit to seal any spaces.
Once the root canals are filled, the dentist will seal the access hole in the tooth with a temporary filling. This helps protect the tooth until you return for the next step. Keeping the tooth sealed prevents contaminants from seeping in, ensuring the treatment’s success and giving you peace of mind. Always follow your dentist’s aftercare instructions.
Placing a Temporary or Permanent Crown
In many cases, placing a crown is the final step to restoring a tooth after a root canal. You might wonder why a crown is necessary. Well, it provides the strength and protection your tooth needs to prevent future damage. Depending on your situation, your dentist may place a temporary or permanent crown.
- Impression Taking: The dentist will take impressions of your tooth to create a perfect fit for the crown.
- Temporary Crown Placement: While waiting for the permanent crown, a temporary one safeguards your tooth.
- Permanent Crown Fitting: Once ready, the permanent crown is fitted and adjusted for comfort.
- Securing the Crown: Finally, the dentist secures the crown with strong dental cement.
These steps guarantee your tooth is restored effectively.
Aftercare and Recovery
With your crown securely in place, it’s important to focus on aftercare and recovery to guarantee your tooth heals properly. Start by avoiding hard or sticky foods that might dislodge the crown. Over-the-counter pain relievers can help manage any discomfort, but if pain persists, contact your dentist. It’s critical to maintain a good oral hygiene routine; gently brush and floss, taking care around the treated area. You might experience some sensitivity, but this usually subsides in a few days.
Schedule a follow-up appointment to confirm everything is healing as expected. If you notice unusual swelling, persistent pain, or any other concerns, don’t hesitate to reach out to your dental professional. Taking these steps will aid in a smooth recovery and long-term dental health.
Frequently Asked Questions
How Long Does a Root Canal Procedure Typically Take?
You’re probably wondering how long a root canal takes. Generally, it lasts about 60 to 90 minutes, but it can vary depending on the tooth’s condition and complexity. Make sure you discuss any concerns with your dentist.
Are There Alternative Treatments to a Root Canal?
You might consider alternatives like pulp capping or tooth extraction, depending on the severity of decay or infection. However, these options aren’t always suitable. Consult your dentist to determine the best course of action for your situation.
Can I Eat Before a Root Canal Procedure?
You can eat before a root canal, but it’s smart to have a light meal. After the procedure, your mouth might feel numb, so eating beforehand guarantees you’re not hungry during recovery. Always follow your dentist’s advice.
Will My Insurance Cover the Cost of a Root Canal?
You’ll need to check with your insurance provider since coverage varies. Some plans cover a portion of root canal costs, while others might not. Contact your insurer for details on what’s included in your policy.
Is It Normal to Feel Anxious About Getting a Root Canal?
It’s completely normal to feel anxious about getting a root canal. You’re not alone in this, and many people share the same concerns. Communicating with your dentist about your fears can help ease your worries.
- About the Author
- Latest Posts
Our Editorial Team are writers and experts in their field. Their views and opinions may not always be the views of Wellbeing Magazine. If you are under the direction of medical supervision please speak to your doctor or therapist before following the advice and recommendations in these articles.