A fresh coat of paint can completely transform a french interior door — but painting one is not quite the same as painting a solid slab. The glass panes, the narrow muntins, and the detailed frame require a specific sequence, the right tools, and patience. Rush any step and you end up with drips in the glass channels, brush marks across the stiles, or paint that peels within a year.
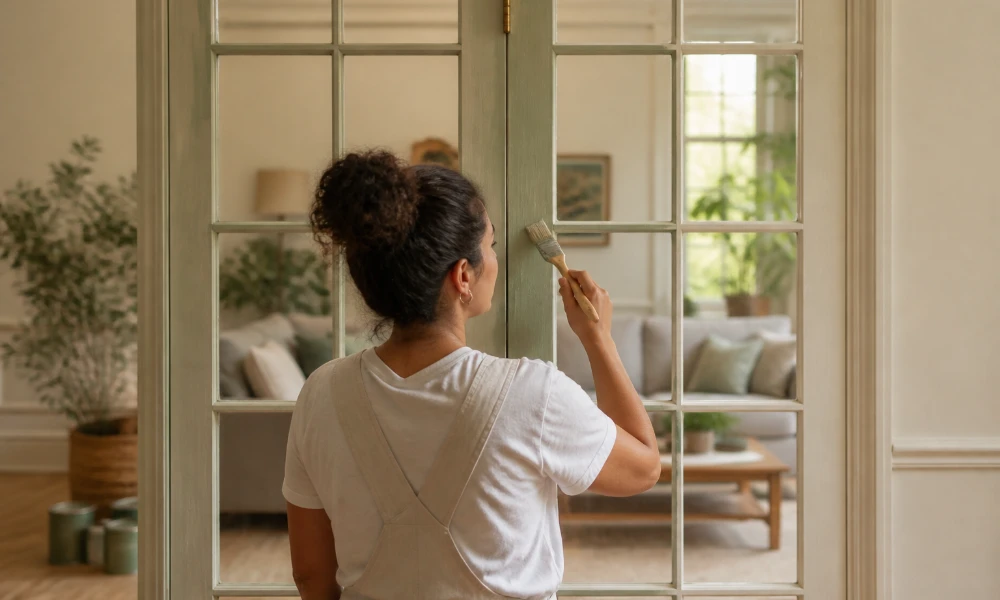
This guide walks you through the full process: surface prep, priming, painting, and the finishing details that separate a professional result from a DIY job that looks like one.
Why Painting a French Door Is Different
A french interior door has multiple glass panes divided by thin wooden strips called muntins. These narrow surfaces are difficult to reach with a wide brush, collect drips easily, and require a deliberate painting sequence to avoid smearing wet sections you’ve already finished. The glass adds another layer of complexity: even careful painters benefit from masking tape along the glass edges, because any paint that lands on the glass has to be scraped off after curing.
The combination of detailed woodwork and exposed glass also means preparation takes longer than on a solid door. Budget extra time for masking and sanding — the steps most DIYers rush — and the actual painting goes smoothly. Skip them, and you spend that time fixing problems instead.
What You’ll Need
- Fine-grit sandpaper (120 and 220 grit)
- TSP cleaner or mild degreaser, rubber gloves
- Painter’s tape (3/4 inch works best on glass edges)
- Quality angled sash brush (1.5 to 2 inches)
- Small foam roller (4-inch)
- Interior wood primer
- Interior paint in satin or semi-gloss finish
- Drop cloth, clean rags, putty knife
Step 1: Remove the Door (When Practical)
Removing the door and laying it flat on sawhorses gives you better control and reduces drips. That said, removal isn’t always the right call — heavy solid-core doors, composite doors that can warp horizontally, or doors with fixed hinges are all cases where painting in place makes more sense. If you do remove the door, pop the hinge pins and carry it to a well-ventilated workspace. If not, wedge it open and protect the floor and frame with a drop cloth.
Step 2: Clean and Sand the Surface
Do this before masking — sanding after tape is applied lifts the edges and pushes dust into the adhesive.
Wipe down the entire door with a TSP solution or degreaser, focusing on the handle area and edges. Safety note: TSP is a strong cleaner — dilute it to the ratio on the packaging, wear rubber gloves, and work with ventilation. A dish soap solution works fine for lightly soiled surfaces. Rinse and let the door dry completely.
Once dry, scuff the surface with 120-grit sandpaper. You’re not stripping the finish — just giving the primer something to grip. On the stiles and rails, sand with the grain. On the muntins, use a folded piece of sandpaper or a sanding sponge for control — the goal is a light scuff only, not rounding off the profile edges. Wipe all dust with a tack cloth.
Step 3: Mask the Glass Panes
Press painter’s tape firmly along each glass edge, leaving only the wood exposed. Use a putty knife to press the tape into the channel where glass meets frame — this is where drips collect and the seal needs to be complete. Masking liquid is sometimes suggested as an alternative, but it’s less common in residential DIY, harder to control for a sharp edge, and requires more experience. For most homeowners, tape is the more reliable option.
Step 4: Apply Primer
Primer is not optional when painting a french interior door for the first time or making a significant color change. It seals the wood, blocks tannins from bleeding through the topcoat, and gives the paint a uniform base. Apply with the same brush sequence you’ll use for the topcoat. Allow to dry fully — usually two to four hours — then sand lightly with 220-grit sandpaper and wipe clean.
Step 5: Paint in the Right Order
Painting out of sequence means touching wet sections, leaving smears and fingerprints. Follow this order:
1. Muntins first — use the angled sash brush on the thin glass dividers. Keep the brush lightly loaded to avoid drips into the glass channels.
2. Glass frame channels — work the brush carefully into the narrow channel where glass meets wood.
3. Solid panels — if your door has any solid sections, paint these next.
4. Horizontal rails — the cross-sections at top, middle (if present), and bottom.
5. Vertical stiles — finish with long strokes running the full length of each side.
6. Edges — top, bottom, and latch edge last.
Use the sash brush for all detail work. Switch to the foam roller on the flat sections of rails and stiles — it helps reduce brush marks on larger surfaces. If the paint is too thick, the roller can introduce small bubbles; thin the paint slightly or switch back to a brush if that happens.
Step 6: Apply the Second Coat
Let the first coat dry fully before applying the second — wet paint drags and pulls when you work over it too soon. Sand any rough spots or drips lightly with 220-grit sandpaper, wipe clean with a tack cloth, and repeat the same painting sequence from Step 5.
Two coats of paint over primer is the standard for a french interior door. If you’re making a dramatic color change — white to black, for example — a third coat may be needed for full, even coverage. Trying to achieve that coverage in two heavy coats instead of three thin ones leads to drips and uneven texture, so it’s worth the extra pass.
Step 7: Remove the Tape and Clean the Glass
Remove the tape while the paint is still slightly tacky — typically 1 to 2 hours after the final coat. This is the timing sweet spot: the paint has enough body that it won’t smear, but hasn’t hardened over the tape edge yet. Waiting too long risks tearing the paint edge when you pull. Remove at a 45-degree angle, slowly and steadily.
For any paint that landed on the glass, wait until the paint is fully cured before scraping. Water-based latex needs at least 48 hours; oil-based paint can take longer. Wet the glass lightly with soapy water first — this lubricates the blade and prevents scratching. Hold the razor blade as flat against the glass as possible and push in one direction only.
Finish and Color Choices
Satin and semi-gloss are the standard finishes for interior doors — both clean easily and hold up to daily contact. Semi-gloss has more sheen and makes the door a feature; satin integrates more quietly into the room.
For color: white or off-white is neutral and works everywhere. Black or dark charcoal makes the door a focal point, particularly in modern spaces. Matching the wall color turns the door into an architectural detail rather than a separate element.
If you’re shopping for a new door rather than repainting an existing one, many come factory-primed and ready to paint. Suppliers likeDoors and Beyond carry a wide range of French interior door in primed finishes — a better starting point than raw wood.
Common Mistakes to Avoid
Skipping primer. Primer is what separates paint that lasts years from paint that peels in one.
Painting in high humidity. Paint won’t adhere or dry correctly in humid conditions. Choose a moderate-humidity day or run a dehumidifier.
Closing the door too soon. “Dry to touch” is not the same as cured. Latex paint feels dry in 1–2 hours but needs 48–72 hours to cure enough to close without sticking. Oil-based takes longer — up to 7 days for full cure. Keep the door propped open until you’re sure.
Overloading the brush on muntins. Too much paint on the thin dividers runs straight into the glass channels and is difficult to remove once dry.
Getting paint in the hinge mortises. Paint buildup in the hinge recesses affects how the door hangs and prevents the hinges from seating flat.
Final Result
A properly painted french interior door looks factory-finished when the prep and sequence are right. The glass panes make the job more demanding than a solid door — but they also make the result far more visible, and worth the extra care.
Whether you’re refreshing an existing door or painting a new primed door for the first time, the process above applies directly. Take your time on the prep and the masking, follow the painting sequence, and the finish will show it.
- About the Author
- Latest Posts
Our Editorial Team are writers and experts in their field. Their views and opinions may not always be the views of Wellbeing Magazine. If you are under the direction of medical supervision please speak to your doctor or therapist before following the advice and recommendations in these articles.